WEBPAGER HELP
Instructions on this page will guide you on how to manage your website pages, posts and eCommerce system. Should you require more assistance, kindly click here to contact us.
IMPORTANT NOTICE
A. The "Update" or "Publish" buttons mentioned in this guide may be blue, brown or some other colour. Kindly take note.
1. While you can make posts, manage your store, add products, images, coupons etc on any device. All edits to your website pages SHOULD be done strictly on a laptop/desktop computer.
2. Size of all uploaded images should be less than 200kb for a fast load time. The system will reject images above 200kb. Try compress your images before upload. A good way to compress your pictures is to search for and use an online image compressor/resizer or better still, send them to a WhatsApp contact and ask the contact to send the picture back to you. WhatsApp compresses pictures effectively. You can then use the picture you received.
3. Recommended browser for mobile use is Chrome on Android and Safari on iPhone.
Managing your website pages and blog posts
- On a laptop/desktop, click on Pages on the left side of the dashboard. It is not advisable to edit pages on mobile.
- Place your cursor/mouse over the page you want to edit and click Edit.
- Place your cursor/mouse over the section you want to edit then click Edit.
- Edit the content as desired. Click on the blue Done button on the right side of the screen.
- Scroll down the page and click on the blue Update button on the right side of the screen.
- That's all! Do the same for any other page you need to edit the content.
If your website has a blog or news section, you can add new posts by following the steps below.
- Click on Posts on the left side of the dashboard. Then select Add New.
- Enter the post title, then type or paste in your post content in the editor below.
- To add pictures to your post, click on the Add Media button above the post editor and select or upload your image. Then click the blue Insert into post button.
- Once done, click the blue Publish button and you are done.
Managing your store (eCommerce)
- If on mobile, you'll need to click the menu icon to reveal the menu.

- Click on Products in the dashboard menu (left side of the screen).
- Click on Add New.
- Enter the Product name in the first space.
- The second space is for long descriptions. Use this to enter any additional details about the product.
- Product short description. This is a very important field. Whatever you enter here will be shown directly beneath your product image when it is clicked. Keep it short and simple stating the most important details about the product. Longer descriptions should be entered into the field above.
- Product data. For regular products, leave it as Simple Product. Enter the price of your product in the Regular price field without commas. For example, enter 10000 and not 10,000. No commas, no periods (full stops), no currency sign. leave the Sale price field empty.
- If you want to put a product on sale, or make it look like it's on sale, enter an higher price in the Regular price field and enter the price you want customers to pay in the Sale price field.
- Click on the inventory icon (see circle A in the image below). Enter an SKU (see circle B in the image below). SKU means Store Keep Unit. This is a unique identifier for all your products. For instance, if your business name is "Fine Goods" You may use the first letters in your business name "FG". So the SKU for each product will be FG1, FG2, FG3, etc. A new number for every product. You can also get creative with the naming, just make sure it's a unique name for each product.

- This step is not compulsory, you may skip to step 11 below if you do not need to manage your stock quantity. You may want to control your stock- in case you have a limited number of a product. This is useful so that customers don't order more than what you can deliver. Click on the manage stock? check box (see circle C in the image above). Enter your stock quantity (see circle D in the image above), customers won't be able to order more than this amount. You may also want to set the Low stock threshold (see circle E in the image above) , enter any value you like 5, 2, 1 or 0. You'll receive an email notification once your stock quantity drops to that value.
- Product image. Click on "Set product image" and then click Upload Files. Select your product image and upload it. Note that all images must be less than 200KB. Files above 200KB will be rejected by the system.
- Make sure the image is selected then click on the blue set product image button.
- Make sure the image loads and you can see it in the product image editor.
- Product gallery. This section is not necessary. It is used to add more pictures of the product in cases where you have different views or variable products like colours etc.
- Scroll down and click on the blue Publish button.
- That's all! Your product should now be added to your store.
- To add a variable product, you'll need to create Attributes. These attributes can be colour, size, length or whatever variable your product has.
- If on mobile, you'll need to click the menu icon to reveal the menu.

- Click on Products in the dashboard menu (left side of the screen).
- Click on Attributes.
- Enter only the attribute Name. For example, colour then scroll down and click the blue Add attribute button. Don't change anything else. You can add as many attributes as you need. Colour, size, length, etc.
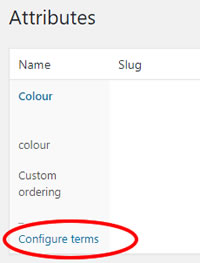
- Click on Configure terms beside or under any attribute to add the variables (see image below). For example, for the colour attribute, we can configure as many colours as possible. Simply type in the colour name, example; white then click the blue Add new colour button below. Enter another colour name and click the blue Add new colour button again. Do this again and again for every new colour you want to add. You can always come back to add more colours by clicking on Configure terms.

- Repeat the process above to add new attributes (colour, size etc). Add an attribute, click on Configure terms, then click on the blue Add new button below.
- Once you have created the attributes you need, click on Products in the dashboard menu (left side of the screen).
- Click on Add New.
- Enter the Product name in the first space.
- The second space is for long descriptions. Use this to enter any additional details about the product.
- Product short description. This is a very important field. Whatever you enter here will be shown directly beneath your product image when it is clicked. Keep it short and simple stating the most important details about the product. Longer descriptions should be entered into the field above.
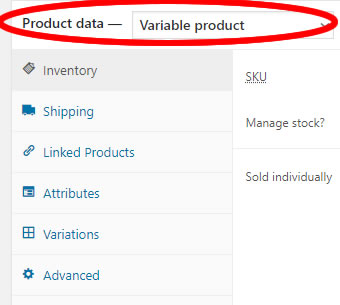
- Product data. Click on Simple Product and change it to Variable Product (see image below). Enter an SKU. SKU means Store Keep Unit. This is a unique identifier for all your products. For instance, if your business name is "Fine Goods" You may use the first letters in your business name "FG". So the SKU for each product will be FG1, FG2, FG3, etc. A new number for every product. You can also get creative with the naming, just make sure it's a unique name for each product.

- Click on the Attributes tab (see the attributes tab icon in the image above) and (see circle 1 in the image below) .
- Click on the Custom product attribute (see circle 2 in the image below) field and select the attribute you want to add to the product, then click the Add button beside. Remember that you must have created the attribute and configured it with your variations as done at the beginning of this guide.

- Click on select terms under Value(s) (see circle 4 in the image below) and select the variables you configured under that attribute. You can also add new variables for the particular product by clicking the Add new button (see circle 5 in the image below) .

- Click the Used for variations box (see circle 6 in the image above) to check it then click on Save attributes (see circle 7 in the image above) .
- Click on the Variations tab (see circle 8 in the image below) then click Go (see circle 9 in the image below)

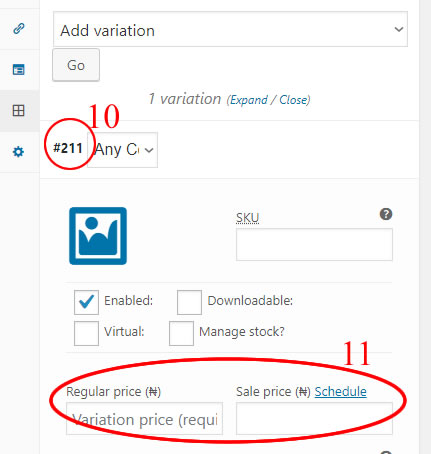
- Click on the variation number (see circle 10 in the image below), enter the product price (see circle 11 in the image below), then scroll down and click on the blue Save changes button.

- Product image. Click on "Set product image" and then click Upload Files. Select your product image and upload it. Note that all images must be less than 200KB. Files above 200KB will be rejected by the system.
- Make sure the image is selected then click on the blue set product image button.
- Make sure the image loads and you can see it in the product image editor.
- Product gallery. If your product has a variable of colours or any noticeable difference, you can add more images showing these variables.
- Scroll down and click on the blue Publish button.
- That's all! Your product should now be added to your store with the variables active. Customers can then select an option before adding the product to their cart.
- Click on Products, then click on All Products.
- To edit a product, place your cursor/mouse over the product you want to edit and click Edit.
- Edit the product as desired, scroll down and then click the blue Update button.
- To delete a product, place your cursor/mouse over the product you want to delete and click Trash.
- After that, you'll now see another Trash option above (see circle 12 in the image below), click on that and click Delete Permanently (see circle 13 in the image below).

To control your stock, see the instructions in step 10 under the How to add products to your store section above.
When you receive orders, you'll need to manage them in order to mark them as appropriate.
- Click on Orders in the dashboard menu. On mobile, you'll need to click the Orders submenu again.
- Click on the order number/name.
- Under Status (see circle 14 in the image below), select the applicable status, scroll down and click on the blue Update button. For example, if you have delivered an order, select completed, then update as described earlier. This will send a mail to the customer that the order has been completed.

- Click on Coupons in the dashboard menu.
- Click on the Add coupon submenu.
- Enter the coupon code. For example, save20 to give a 20 percent discount or save500 to give a #500 discount.
- Scroll down to Coupon data.
- To give a percentage discount, for example, 20%. Click the Discount type field and select Percentage discount. Enter the Coupon amount in percentage, for example, 20. Then click the blue Publish button by the right side or under the editor.
- To give a fixed price discount, for example, #500. Click the Discount type field and select Fixed product discount. Enter the Coupon amount, for example, 500. Then click the blue Publish button by the right side or under the editor.
- You can delete or edit a coupon by clicking coupons in the dashboard menu then select Edit or Trash as required.
- Create a product as normal
- If you have requested the category feature, you'll see a category field before product image.
- Select the appropriate category and the product will be automatically added to that category.
- Publish the product as normal.
